Monday 28 September 2015

Ceramics Workshop

Last week on the 17th of September I had my second workshop, which was ceramics. Ceramics is pots and other articles made from clay hardened by heat. This workshop was led by our instructor Debra who has a lot of experience with this type of art. The workshop started off with Debra going through some ground rules on all the equipment and other health and safety policies so that we would be safe and act sensible during our time in the ceramics room. After the rules were lay out on the table, Debra then learnt me and the rest of the class on how to role clay and get rid of any unwanted air bubbles in the clay itself. To make sure we didn't have any air bubbles we used a method called wiring where you slice the clay sideward's on to double check the clay. You want to avoid having any air bubbles in the clay as if it does when placing it in the kiln, and when heat is being placed to the clay heat will be trapped in the bubbles enabling it to destroy the clay work or in other matters blow up. If you are wondering a kiln is a furnace or oven for burning, baking, or drying, especially one for calcining lime or firing pottery. Once our clay was rolled out with no air bubbles Debs wanted us to place out hands on the clay and using modelling tool to mark around the edges for a group activity she had planned for us later that day, but sadly had no time at the end to get to it. After the hand carving, using the project brief we had been given for out art class we had to use our creative imagination to think of something to do with hands. I myself then decided to mould my own hand using plaster, taking about five to ten minutes to set just one side of my hand. I also did it to the other side of my hand. The detail that was in both moulds was remarkable they had all the texture in the moulds for instance the lines on the palm of your hands and nails also knuckles. Once both moulds had set and hardened up I started to place fresh pieces of clay into both the moulds and after placing the clay in all of the moulds I took away the extra pieces of clay that were not needed. I then took both clay moulds out of the plaster moulds and placed them together with slit. I wanted to make the hand look as realistic as I could get it. After seeing the results I decided to making another hand and cleaned both them up with cleaning and carving tools to get rid of any excess clay and to add further detail.  


Thursday 24 September 2015

First Official Photography Lesson

On Wednesday 23rd of September was my first official photography lesson with my instructor Victoria, where we explored and set out eyes on our first type of lighting called Rembrandt lighting.  When using Rembrandt lighting there is a specific diagram where everything is place in the studio, for instance the equipment that is used is a light sauce, a subject, camera and a reflector. This equipment is all placed is certain places to create the perfect Rembrandt lighting. If you aren't awhere what "Rembrandt lighting" is, it is a lighting technique that is used in studio portrait photography. This type of lighting is popular because it is capable of producing images which appear both natural and compelling with a minimum of equipment. You will be aware when Rembrandt lighting is at work as you will see a triangle shape underneath the subjects eye, also for the triangle to appear the light should be placed above the subjects head almost at the side of the subject also.
As you can see in this diagram every piece of equipment is placed in a specific place but if the triangle does not appear it is either because you need to instruct your subject to either turn their body or face, or perhaps move your key lighting until you reach the point where you have the perfect triangle underneath the eye. Myself and my other colleague both took the opportunity to take it in turns to experiment this type of lighting on one another and found out using a black background with no lighting except the key light also including the subject sat on a stool looking straight at the camera worked extremely well. Through the lesson we had two shots, one where we used a dish reflector with the image number being 100/8142 and the second shot with the dish reflector also plus adding a silver reflect with the image number being 100/8155. During both shots we were introduce to a white soft box which soften the lighting and really gave an image its best quality, where as white out it made the lighting on the image really sharp and gave it a dark look. When changing the silver reflectors position the image number changed each time, for instance when to the side the number was 8163, above was 8164 and underneath was 8162. Next photography lesson will be all about butterfly lighting which is also used for portraits.

Wednesday 23 September 2015

Art Glossary

In art and design we have been assigned our first project "hands", this then has led us to being introduced to a wide variety of key words that by using images of hands express the words meaning by drawing hands but also showing how the words can be shown in the drawing technique or any other type of media. This then led us to creating glossary pages for everyone of these words and using our imagination to create the perfect imagine definition alone with the actual definition. We have started creating the glossary pages by a method called stretching paper, which enables us to work on a hard surface(wooden board)as well as working on paper also we were directed by our tutor Claire Harrison to draw two A4 boxes on to the paper so that when they were finished we could we could cut them out. We were introduced to the principles of design, which are; contrast, pattern, emphasis, balance, proportion/scale, harmony and rhythm/movement. Where as last week we were focused on the elements of design, that are; line, shape, direction, size, texture, colour and value. I then started my glossary pages for the elements of design and started with the key words "value" and "lines". For my "value" piece I drew a black and white hand so that the colours would contrast, also by using pencil I was able to add detail and shadows as value itself means 'lightness or darkness', also for the title itself I used our newspapers to represent the lightness and darkness. I also did the key word "line" and I used my pinterest account to research other images of hands drawing with lines or based on lines as I was very limited to what I was do because everyone in the class pretty much did the same for the key word lines and I wanted to be different and attempt to stand out, so I drew the outline of a hand a drew lines with pencil inside to show depth and detail of the hand. I then moved on to the principles of design which is the most recent of what I have done up to date. I chose contrast but unfortunately only managed to do one piece of the key words but it took so much time and effort as I put so much determination into it and tried to bring some of my own photography work into it, and so the photo that I used of hands I banished the background and made a background of my own with brushing inks that were grey and blue. With brush inks you never know what it is going to end up looking like so that is what made doing my own background exciting. As drawing hands didn't quite excite me it was such a positive to bring in photography into my glossary pieces.

Tuesday 22 September 2015

Art Critics

The role of an Art Critic is someone who specializes in analysing, interpreting and evaluating art from there perspective, either in a negative way or positive, and there view on art itself or a piece of art. The public in the 21st century tend to associate negativity with the word "critic" but is also seen as a positive as critics nowadays help their readers become aware with the artwork of today and enable to readers to make their own judgements on either their own piece of art or others. Art critics respond to different pieces of artwork by explaining the art, finding either the hidden meaning behind it and also making critical judgements hence the name "art critic". There are three main types of art critics that define art all so differently. Firstly, there are journalists who generally write for the general public of today but also includes their own perspective on art galleries and exhibitions. Another type of critic, there are newspaper reporters that are assigned to write about in particular pieces of art and exhibitions to the general public, which sends a clear view of the art piece. Finally, one last critic is a scholar who are actual artists themselves that write from a professional point of view or texts about other artists. In today's society, critics tend to focus on modern and contemporary art that matches the individuals culture. Art critics have a very important role in the world of art as they respond to varies of different art work that inspire and help audiences make there own judgement in the present day and future.

One example of an Art critic is a man named Robert Hughes, who was not only an art critic but a writer, and a producer of television documentaries. The man was described in 1997 by Robert Boynton of The New York Times as "the most famous art critic in the world".

Friday 18 September 2015

Photography Workshop


In art and design/photography, we are given varies of different workshops to complete in the next upcoming weeks related to our new project “hands on” to create imaginative and unusual pieces of art. Each workshop is different, for instance there is photography, 3D work, paint printing and many more all to be seen in my blog in the upcoming weeks. My 
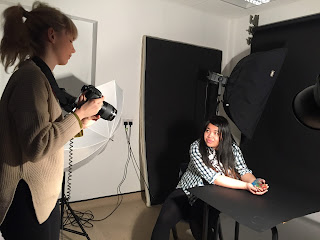
first workshop was photography and I and my two other class mates were guided effortlessly by our instructor Victoria who is also a photography herself considering her worked has been in magazines, newspaper and even vogue which likewise I would like to achieve.

In the process of the workshop we were learnt different types of techniques such as using manual on a camera and what comes along with it like:

Shutter speed(self-explanatory): Which is in simple terms the shutter at the front of the camera what focuses on the object or area you are taking a picture of, for instance on the camera the shutter is open when your finger puts pressure on the button. The longer the shutter is opened for the more blurred the image with be where as if it is only open for a short amount of time it won’t be as blurred. Also on the camera you will see something like this “1/60” this is the shutter speed and the higher the number the clearer the outcome of the picture will be.

Aperture (opening): The aperture is basically an opening, hole, or gap. So for example the larger of the opening the more light is passed through but the depth of field will be smaller, where as if the opening is small there is less chance that the light will pass through. Likewise on the camera the aperture will look like “F24”, for example if the number is small the hole on the camera will be wide open but the area of focus will be small which leads to a shallow depth of field. Nonetheless if the number is fairly large the hole will be smaller and it will enable your camera more focus and a larger depth of field.

ISO (quality of light): The camera's ISO setting is its sensitivity to light. The higher the ISO, the more sensitive it is. As well as letting more light pass through it also collects information. The less light passing through the higher the number looking like this “iso” on your camera.
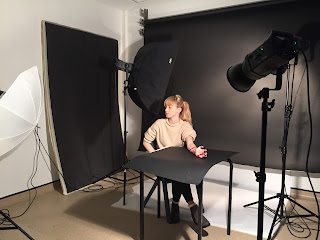
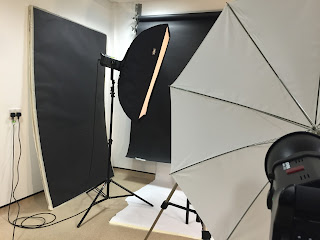
Exposure:  A photograph's exposure determines how light or dark an image will appear when it's been captured by your camera. This is why elements are required such as if 
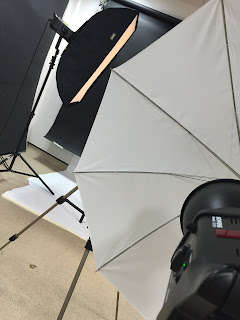
you are in a studio you will need different types of lights. We used flashguns, flash head reflector, Light Modifiers, Light Stands & Mounting and much more.

Throughout the workshop we were given little projects to do each individually or in groups. Firstly, we were all given a camera and were instructed to change it to black and white, to explore different effects and change the techniques we were shown to get a good quality, but remarkable photography of our hands. We had to explore and experiment with the camera’s and use our thoughts to create something unusual that no one had ever done and think outside the box. Throughout our first project Victoria was explaining and describing the main words also another technique called the rule of thirds what all photographs need to have the best quality. A good photography must know these certain words, such as; balance, leading lines, pattern, alternative view point, framing and experimentation. All very important and lead to the perfect photograph. But not all of these are required in every photo in depends on what you are wanting to capture and how effective you want it to be and so much more.

Balance: Is a compositional technique in photography that contrasts images within a frame so that the objects are of equal visual weight.
Leading lines: They're used to draw a viewer’s attention to a specific part of the frame, whether it's a person or an object.
Pattern: A good look to make the photograph look more stimulating and unique.
Alternative view point: Is different and unusual angles that photographs are taken from, for example from an above view or lower view.

Experimentation: Using your own and unique ideas and purposely discovering something unknown, also be creative.

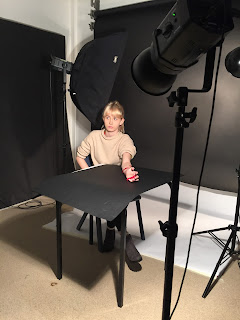
Moving on to project 2 we started to explore and create different types of images using different types of light equipment and thinking of our own independent ideas to try and show either our true colours, personality, a life experience. It could have been anything but it had to capture something related to you with your hands using the studio. I choose a very deep thought for my project relation to my pasted with bullied and I felt confident with my idea which showed anger and relief in the photographs that had been taken of my hands showing my idea and emotional side. In the process of all of our project we went through small difficulties with the lighting but it wasn’t a problem as we were constantly adjusting, taking a photo, adjusting, taking a photo until we got what we wanted in the process and knowing we would get there in the end. Another difficulty for myself was using adobe Photoshop as I had only ever used it once before in my whole life time but it did not stop me from getting one of my photographs perfect and with Victoria’s help made it happen. Overall, I found the workshop very inspirational as I too aspire to be a photography and to be taught by Victoria whose work has been in magazines and many more public places, it just topped it off all off and put me in the right mind set on what I want to do myself and I know I will work incredibly hard to get there. Just working in the studio made it all seem all real and hopefully one day it will be. One thing I think we should have changed was doing more projects the workshop was just not long enough so for next time because I  have a huge affection for photography I think it should have been extended, also to show more skills being used by myself my class mates.


Domino Effect


Yesterday morning I explored ways in which neither I nor my other class mates would have bounded together. Creating imaginative things such as sculptures and playful art, bringing out everyone’s true colours. We were all guided smoothly by an artist called James who gave us guidance and inspiration all throughout the day. I would say that it is extremely important role to play an artist as it releases the inner childhood in yourself and can encourage you to make your work more fun and engaging to the fellow audience. Whilst all the current young artist were creating developed sculptures I myself as a young photographer took the chance to catch natural images throughout the day of friendship being created, team work and the skills being brought to the sculptures. I explored different and unusual angles around the room catching the quality of either objects or people in action.

The elements we took forward in the process were developing our thoughts and ideas from the start to create a range of ideas and putting it into our work for our none existing sculptures what were about to be created. Which by the end brought out the best in everyone’s imaginative ideas. After working independently catching the natural images I needed I later on joined in with the creative activity James had set for everyone on a much larger scale. We worked as a team by agreeing with everyone’s individual ideas for instance the kind of shape the sculpture was going to be and how it was going to stay firm without braking. I personally think creativity is extremely import not just to me but to everyone around the world it really does bring out the good in people and how talented some people are. Creativity brings out the inner child in everyone because without having any interaction with art, I highly doubt anyone would have any imagination, they would just be left blank.

As a group we combined our creativity to create a sculpture which reflected our ideas and thoughts. We divided up our responsibilities by working in pairs within the group to concentrate on different areas of the sculpture. This worked efficiently as in brought the individuals closer together within the activity, and increased our communication skills. Throughout the activities I distance myself from the group to allow myself to explore further into photography making sure I mastered the basics for instances close ups (superzooms) and the lighting of the room. Normally I would use reflectors but as it was my first time on the course I was just proving to the others and myself I know what I am doing when it comes to photography as it has been my passion to be a photographer ever since I was young. I aspire to be in the industry of fashion someday. With the photos I have taken I have adjusted the lighting and contrast to improve the quality of the photos.

Some problems the groups encountered were when they attempted to make smaller sculptures they came to the conclusion that because they weren’t as sturdy and collapsed several times, they stuck to a much bigger surface area. To solve the problem, I myself explored different designs just be walking around the room looking for inspiration and even looking out of the window at the buildings. By sharing my ideas with the group it then led us as a team to change the layout which made it stable and more efficient for the design. This helped me to adapt my skills into the group task whilst also sticking to my photography side of it. The team also faced many different problems just by the sculpture falling down and straight away the team over faced this by fixing the piece and by learning from the mistake change the design.

I recorded the “Domino Effect” by concentrating on my Photography and taking photographs at a high standard all throughout the day to show my skills with a professional camera as I have a lot of experience with them I was able to prove my skills. By taking photographs all throughout the day it showed the progress that was being made with the individuals and also the sculptures. At the end of the workshop we created a mind map to reflect on the day and what everyone had learnt from it. The workshop helped everyone’s social and team working skills all throughout the day and the skills that not only me but the other individuals learnt will overall help us with our lives and my photography course I will have these skills to help me for the next two years maybe even for a life time.  Throughout the day different tasks were set at different times which we followed from the instructor James. As a group it allowed us to plan what we were creating, also explore new techniques and patterns with the dominos. We followed the time we were given accurately and we also had time to spare which allowed us to pack dominos away ready for the next task.

My individual strength’s and tasks were to capture the natural moments whilst individuals were at work and getting to know one another using not only one brain but the groups together. I adapted and developed my surroundings by correcting the lighting and the contrast either making it lighter or darker to increase the quality of the photograph showed my creativity and effort towards my task. I personally think I did my work to a high standard and allowed me to be as creative I can be with the camera by taking photos at different types of angles for instance; side view, above view and many more.

At the end of the workshop the whole entire class created a final piece, which I feel explored every individual’s ideas in the process. As everyone’s skills developed further and further throughout the day the final piece of art was just faultless compared to everyone’s recent designs. I think one thing we as a class could have improved was arrangement work with the dominos so it would be more engaging and creative.

My overall thought of the day was that it was such an inspirational experience because it taught me that there are so many ways out in the world to get individuals working together as a team and socialising, also not being scared to share their opinions and ideas they have because everyone’s opinions and ideas matter so much. If no one ever opened up and shared, everyone would be extremely dull and creativity would be lost. The day also taught me that without creativity and excitement fun art wouldn’t exist, and how important it is for an artist to explore and just be enjoyable. The workshop was also a great success as I got to show my abilities and interest at heart by using the camera and proving I am worthy of photography. It has also helped me gain confidence in showing what I can do within my photography course, and socialising with people I have only just met. Overall, I would recommend this workshop to any other class as it really does benefit you in any way for your course in college. The workshop has helped me a lot within my photography course and to communicate with others.